|
|
 |
| |
| |
| |
 | BROWSE |  |
|
|
|
|
|
|
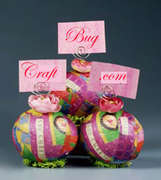
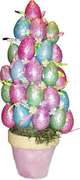
Easter Place Card Holder STYROFOAM™ Brand Foam:
Egg, 3" Other Materials:
Mini pink/yellow ranunculus
Bright green reindeer moss, small amount
Silver craft wire, 20-gauge
Paper, one sheet each: bright pink/multi-floral print tissue; pink card stock
Fine-line black permanent marker
Ruler
Small disposable bowl
Plastic spoon
Water basin
Paper towels
Waxed paper
Scissors
Wire cutters
Long-nose pliers
Low-temp glue gun and glue sticks
Thick, white craft glue
Optional: disposable gloves; hair dryer Instructions
1. Tear tissue paper into several approximately 2" pieces.
2. Mix one part white glue with two parts water in disposable bowl. If desired, put on gloves.
3. Dip one tissue piece into glue/water mixture and then smooth onto surface of foam egg. Continue until egg is completely covered, allowing tissue pieces to wrinkle and overlap. Repeat for all eggs. Place eggs on waxed paper to dry overnight or use hair dryer.
4. Cut 7" length from wire. Bend one end into tight spiral using pliers, leaving opposite end straight.
5. Glue flower to center side of egg as shown. Glue straight wire end into egg through flower center. With flower at top, glue small pieces of moss around base of egg to support it in upright position.
6. Cut place card of desired size from card stock. Write name on card and insert into wire spiral.
Projects by STYROFOAM™ Brand Foam Designed by: Diane D. Flowers |
|
|
|
|
|
|
|
|
|
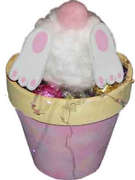
Candy Digging Bunny -
Use Styrofoam ball (size of choice). -
Add fur - Shred cotton balls and glue to Styrofoam ball. -
Add pink pompom (size of choice) for tail -
Make feet out of foam sheet and paint pink pads. -
Glue feet to bunny (Styrofoam ball). -
Paint pot (size of choice). -
Fill pot with Easter grass. -
Add candy of your choice Candy Digging Bunny - Styrofoam ball
- Foam Sheet
- Glue
- Paint
- Easter Grass
- Cotton balls
- Pompom
- Candy of choice
|
|
|
|
|
|
|
|
|
|
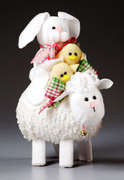
Easter Parade STYROFOAM™Brand Foam:
Ball, 2"
Eggs: one 2"; two 3"; one 6" Other Materials:
Fabrics: white chenille, 11" x 12"; yellow fleece, 4" x 8"; white fleece, 6" x 16"
Felt: white, 9" x 12" sheets, two; yellow scrap; pink scrap
Pom poms: 2" white, two; 1" pink, one
White yarn, 2 yds.
Ribbons: 1-1/2"- and 2"-wide patterned, 1/2 yd. each; pink satin, 1/4" x 1/3 yd.
Embroidery floss: black, 1/2 yd.; white scrap
Black eye beads, four each: 5mm; 6mm
Gold jingle bell, 1"
Wooden craft sticks, two
Pink powdered blush
Serrated knife
Candle stub or paraffin
Pencil
Ruler
Compass or circle template, 5"
Scissors
Embroidery needle, 3"
Low-temp glue gun and glue sticks
Thick, white craft glue
Instructions
General
1.Wax serrated knife with candle stub or paraffin.
2. Cut patterns from fleece and felt as indicated.
3. Once all characters are completed, glue bunny's bottom to lamb, leaving space for chicks. Glue chicks into bunny's arms as shown.
Bunny
1. Cut thin slice from narrow end of one 3" foam egg for body. Cut thin slice from one side of foam ball for head.
2. Cut two 5" circles from white fleece. Center foam head, rounded side down, on one fleece circle. Pull fleece edges up to flat side of head and glue to secure; this side is bottom of head.
3. Refer to photo and use scissors tip to poke two small holes for eyes into head; glue 6mm beads into holes. Glue white pom poms to head below eyes for muzzle. Glue pink pom pom nose in place. Use fingertip to blush cheeks.
4. Pleat ears along pattern lines and glue to head as shown.
5. Use second fleece circle to cover foam body in same way as head. Glue head to body; hold firmly until glue dries. Tie 1-1/2"-wide ribbon into bow around neck; trim ends.
6. Refer to Diagram 2 to glue arms and legs to sides of body.
Lamb
1. Cut remaining 3" foam egg in half for head; reserve one half for a future project. Cut thin slice from one long side of large egg for body.
2. Cut four 2" x 6" pieces from white felt for legs. Use scissors to gently round corners on chenille fabric rectangle for body.
3. Place foam head, flat side down, onto white felt. Use pencil to trace around head, 1-1/2" beyond foam edge; cut out. Center head, rounded side down, on felt. Pull felt edges up to flat side of head and glue to secure; this side is bottom of head.
4. Refer to photo and use scissors tip to poke two small holes for eyes into head; glue 6mm beads into holes.
5. Thread needle with three strands floss; knot ends. Insert needle through bottom of head, coming out at center front below eyes. Make small vertical straight stitch and take needle back through head; knot and clip threads. Glue nose to face.
6. Fold yarn in half repeatedly until it measures 4" in length; tie center of bundle with white floss. Glue bundle to top of head.
7. Pinch ear ends together and glue to either side of head, just under yarn. Use fingertip to blush cheeks.
8. Center body, rounded side down, on wrong side of chenille fabric. Pull fabric edges up to flat side of body and glue to secure; trim excess. This side is bottom of body.
9. For legs, cut craft sticks in half. Wrap and glue white felt strips cut in Step 2 around each leg. Refer to Diagram 1 to make slits in bottom of body; glue legs into slits
10. Glue head to wide end of body; hold firmly until glue dries. Slip bell onto pink ribbon and tie around neck. Tie 2"-wide ribbon into bow; trim ends and glue to back of head.
Chicks
1. Cut small, 2" foam egg in half for bodies.
2. Use pencil to trace half-eggs onto yellow fleece, drawing 1-1/2" beyond foam edges; cut out. Center one half-egg, rounded side down, in center of each fleece piece. Pull fleece edges up to flat side of body and glue to secure; this side is back of body.
3. Refer to photo and use scissors tip to poke two small holes for eyes into each head; glue 5mm beads into holes. Glue beaks to faces under eyes. Glue wings to sides of bodies.
Projects by STYROFOAM™ Brand Foam Down load pattern @ http://craft.dow.com/craft/proj/1605.htm
Designed by: Debra Quartermain |
|
|
|
|
|
|
|
|
|
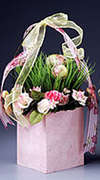
Easter Arrangement STYROFOAM™ Brand Foam: Cube, 5"
Eggs: one 2"; two 1-1/2" Other Materials:
Paper: pastel/multi-floral tissue, one sheet; scrapbook papers of choice, two 12" x 12" sheets (Provo Craft® Scrap Pads™ #40-1476, #40-1478 and #40-1448 were used here)
Florals: green grass, two bunches; pink mini roses with leaves, 12; yellow mini roses with leaves, six; small pink filler flowers, six; bright green reindeer moss, one bag
Brown paper-covered wire
Ribbon: pink/floral organza, 1-3/8" x 5/6 yd.; sheer yellow wire-edged, 7/8" x 1-1/2 yd.
Serrated knife
Candle stub or paraffin
Pencil
Ruler
Wooden skewers, 6", three
Small disposable bowl
Plastic spoon
Water basin
Paper towels
Waxed paper
Scissors
Wire cutters
Long-nose pliers
Bone folder
Low-temp glue gun and glue sticks
Thick, white craft glue
Eggs Instructions
1. Tear tissue paper into several approximately 2" pieces.
2. Mix one part white glue with two parts water in disposable bowl. If desired, put on gloves.
3. Dip one tissue piece into glue/water mixture and then smooth onto surface of foam egg. Continue until egg is completely covered, allowing tissue pieces to wrinkle and overlap. Repeat for all eggs. Place eggs on waxed paper to dry overnight or use dryer.
4. Use glue gun to glue one end of skewer into side of each egg for "stems".
Basket
1. Wax serrated knife with candle stub or paraffin. Use knife to cut 1" border into top of foam cube. Remove foam inside border to a depth of 1".
2. Cut one 24" length from wire and form into rounded handle. Glue handle ends into opposite corners at top of cube.
3. Choose paper(s) to cover cube; designer chose one predominantly green, one yellow and one pink pattern as shown here. Cut two 6" x 12" strips and one 5" square from desired paper for each basket.
4. Carefully wrap each 6" x 12" strip around sides of cube, overlapping excess on opposite corners; gently finger crease corners. Remove paper and crease folds with bone folder. Use white glue to adhere paper to cube; hold in place until glue sets. Glue 5" paper square to bottom of cube; let dry.
5. Trim grass stems as needed and glue into top of basket. Use glue gun to glue small clumps of moss around grass bunches, filling gaps between grass and paper. Trim flower stems and glue into top of basket around edges, between grass and paper.
6. Loosely wrap pink ribbon length around wire handle. Cut ribbon ends in a "v." Tie center of yellow ribbon length into loopy bow around center of handle. Finger curl ribbon streamers; cut ribbon ends in a "v." Spot glue ribbon to arrangement to secure.
Projects by STYROFOAM™ Brand Foam Designed by: Diane D. Flowers |
|
|
|
|
|
|
|
|
|
Egg Topiary -
Use Styrofoam cone (size of choice). -
Glue eggs to Styrofoam cone (plastic or Styrofoam). -
Add ribbon bows or Easter grass between space of eggs. -
Paint pot (size and color of choice) -
Add egg topiary to pot. -
Fill pot with Easter grass or Pete moss. |
|
|
|
|
|
|
|
|
|
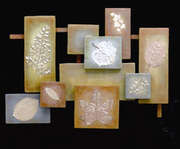
Wall Art STYROFOAM™ Brand Foam:
Sheet, 36" x 12" x 1" Other Materials:
Acrylic paints: light olive green; dark olive green; burnt sienna; raw sienna; black; white
Metallic acrylic paints: bronze; pearl white; champagne
Brushed metal-finish spray paints: dusty terra cotta; champagne
Wooden strip, 24" x 1" x 1/4"
All-purpose joint compound
Silk leaves and ferns
Serrated knife
Candle stub or paraffin
Fine-line black permanent marker
Pencil
T-square
Soft paintbrush, 1" wide
Putty knife, 2-1/2" wide
Disposable palettes, two
Water basin
Paper towels
Scissors
Craft pins, 1/2"
Soft rag
Natural sponge
Sandpaper: fine; medium
Utility knife or small hand saw
Low-temp glue gun and glue sticks
Thick, white craft glue
Hook-and-loop tape picture hanger tabs
Instructions
1. Wax serrated knife with candle stub or paraffin. Refer to diagram to measure and mark 10 blocks onto foam sheet. Cut out pieces.
2. Use putty knife to apply smooth coat of joint compound to front and sides of each foam block; let set according to manufacturer's directions.
3. Gently smooth any imperfections in blocks with a damp rag, rinsing rag frequently. Let blocks dry completely. If desired, sand dried compound for smoother finish.
4. Thin light olive green and burnt sienna paints with water on one palette to create washes. Squeeze remaining paints onto second palette.
5. Brush light olive green wash across front and sides of first foam block. Quickly dip brush into dark olive green paint from second palette, dip brush into water, and then apply along sides and front edge of block. Note: If green wash is too dry and darker shade leaves a sharp edge, use damp sponge to re-moisten and blend paints.
6. Repeat Step 5 to basecoat each foam block, half with the light olive green wash and dark olive green paint and half with the burnt sienna wash and raw sienna paint. This creates "shining light" effect at center of each block.
7. To complete painting, mix and place tones from light to dark on each block, working from lighter center to darker edges. Keep a damp, natural sponge on hand to wipe away excess paint or errors in placement. Adding and wiping away colors adds interest; each block should be a little different. Let dry completely.
8. Dip dry brush tip into metallic paint and stroke off on paper towel until very little paint remains. "Dry brush" paint over surface of each block to highlight and add dimension. Reload brush and remove paint as needed to achieve desired look. Let dry completely.
9. Spray paint silk leaves several times. Glue and pin leaves to centers of several foam blocks. Let dry.
10. Paint wooden strip desired shade; let dry. Dry brush metallic highlights, if desired, and let dry.
11. Refer to photo to arrange leaf blocks in pleasing structure. Use glue gun to adhere any overlapping blocks to one another.
12. Cut wooden strip into pieces long enough to connect blocks that need support in desired arrangement. Hot glue strips to backs of foam blocks.
13. Attach hook-and-loop hangers to back of arrangement. Peel away liners and press to wall. Projects by STYROFOAM™ Brand Foam Designed by: Kathleen George
Down load pattern @ http://craft.dow.com/craft/proj/1605.htm
|
|
|
|
|
|
< Previous 5 10 Next >
|
|
|